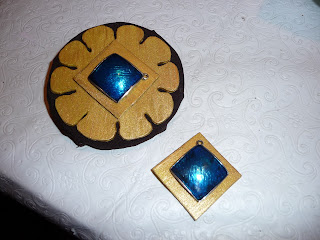
This weekend, I advanced on my Zelda cosplay. Firstly, I made the brown belt and the brooch it goes with. Then I also worked on the second, "Golden shield" belt that hangs over that.
 It´s the first time I´ve ever made an accesory, to tell you the truth. The brooch is attached to a belt. To make the "brown" in the brooch match the "brown" in the belt, I made two cardboard circles, glued them and covered them in fabric.
 Then I glued the metal part which actually makes the brooch a brooch.
The "gems" are earrings (you can see the little loop....which I left on purpose as it helps me know which side is "up" XD). I found them at Bijoux Brigitte and though that they were *perfect* for simulating a jewel; much more than your typical "plastic ones"...
The "golden flower" design on the brooch was a pain in the *ss to draw, cut and paint.... I ended up making it out of thin foamy and coating it in gold paint. I finally managed even petals on the flower by using an inverted 5-point star design, rotated and doubled within a circle of the same diameter of the brooch. Gah. But it turned out perfect, so it was worth it.
This is what the brown belt looks with the brooch pinned on it and holding it together.Just like it should.
As far as the second belt, I haven´t taken a "finished" picture yet, though it definitely looks great. :) I figured it was too much of a hassle (and expensive and time-consuming) to make a belt from scratch. So I looked for a likely belt and found a nice silver one at (you guessed it) Bijoux Brigitte. Geez, such a good place for cosplay supplies (LoL) if it weren´t for the prices.
First step: Spray paint the silver belt gold (and decide that I want to buy a silver one for everyday use, hahaha). In a corner, you can see the reference image I printed out...which is like THE only official reference image of Zelda you can find for this game...Guess that´s what happens when you want to cosplay soemthing before its release....
Step 2: in order to get that "shield" look, it´s necessary to, well---fill in the holes. Preferrably with something slightly raised so as to keep it loking like a "shield", somehow. That´s where my foamy comes in again (thank goodness I have oddles left over from my armor last year).
I cut out the necessary amount of circles (12, with 5sm diameter).
It was originally yellow foamy (though I also have white leftover). That way, the inevitable "shine through" through the paint (and in teh case that it gets chipped) is more easily disguised.
I painted it gold, just like the other pieces.
Oh, curious detail--I painted it (the foamy) with the same gold fabric paint that I plan on using on the dress, in the hopes that the shades will look similar enough. It works out nicely (though the surface of the foamy stays slightly "sticky"...not enough for anything to stick, per se, but enough to be recognizable as "sticky").
Step 3: Attach the circles to the belt. Let dry on a horizontal surface. I used superglue. Love that stuff.


god, I love your blog! You are so creative! I love to see how your cosplays take form!! :D
ResponderEliminar