martes, 27 de septiembre de 2011

Zelda progress: Side-skirt pattern

I really like the new design that Zelda has in this game. I can´t wait for it to be released! I like how simple the design is, but it still has a few details that make it woth it.

One of them is the painted design on the blue side skirt:
The shame about working with an official image when a game hasn´t been released yet is that if there´s only one image, and you still want to do it...you have to get creative. So, basically, i looked at the design and assumed that that was "about half" of the design, and that it´d only be natural is the other "about half" was a mirror image.

I drew it like so:


Then I doubled it on a piece of thin cardboard, so that the design was complete.  Then I cut it out very very carefully:


You can see in the center, I left an area that has a "square" on it....those sections are supposed to be separate, but in order to maintain symmetry and not have those sections wiggle around, I decided to leave them attached and just modify them late when tracing and painting.


Next, I put the design on top of the blue "half-skirt" section....and secured the bottoms agains slipping with regular old tape.


I traced the design onto the blue fabric with a silver chalk-pencil. They´re handier to use and easier to trace with than regular chalk....


You can only vaguely see the lines, due to the flash lighting......but they were pretty visible IRL.This is the moment when I "corrected" the sections that needed to be separate within the design.

I didn´t want to make any mistakes, so I traced the outline first, once more, but this time finally with white fabric paint. I thought about making the design in really light blue, but ran into the problem of having to mix colors...I DID buy both blue and white, but ended up thinking that the design would contrast better if it were in white; plus, it was really really light blue, right? White can work.


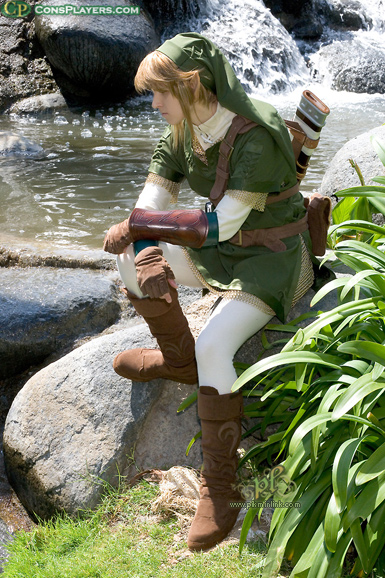
You can really see it taking shape here--it´s an eagle! or a bird design, at the very least; just like with bird that accompanies Zelda and is supposed to accompany Link as well. I believe that one of the premises in Skyward Sword are bird races of a sort or traveling on those huge birds from one place in the sky to another.

The design after the first coat of paint. By God, that was like pushing a rock uphill.....it took me really long to do this first "filling" because I had to be extra careful and make all the brushstokes even.


Final result, after a second coat of paint! It looks quite nice. I´m debating on whether I should add an extra coat again or not, but frankly I like this look. It´s opaque, the brushstrokes aren´t very visible, and yet it has a slight bluish tint. I had no idea that the dark blue would show up a bit through two layers of white...it´s a really strong color...and yet, that works. Almost like the picture. I´ll just have to attach it to the brown belt now, after I sew those sides again (made them too wide the first time).

So, what do you think? I had to use three different size brushes to paint this lovely!! (You can see at least two of them poking in corners of the pictures, hahaha) I´m quite satisfied; it´s the most complex design I´ve tried painting for a cosplay so far, considering I had to partially "guesstimate" some of it....

Zelda Progress: Belts and brooch

It seems like weekends are really the only time I ever get to work on my cosplays lately. There are only two weeks left until the con, though, so I defintiely need to squeeze in some work on weekdays or I won´t make it!!


This weekend, I advanced on my Zelda cosplay. Firstly, I made the brown belt and the brooch it goes with. Then I also worked on the second, "Golden shield" belt that hangs over that.

It´s the first time I´ve ever made an accesory, to tell you the truth. The brooch is attached to a belt. To make the "brown" in the brooch match the "brown" in the belt, I made two cardboard circles, glued them and covered them in fabric. 

Then I glued the metal part which actually makes the brooch a brooch.

The "gems" are earrings (you can see the little loop....which I left on purpose as it helps me know which side is "up" XD). I found them at Bijoux Brigitte and though that they were *perfect* for simulating a jewel; much more than your typical "plastic ones"...

The "golden flower" design on the brooch was a pain in the *ss to draw, cut and paint.... I ended up making it out of thin foamy and coating it in gold paint. I finally managed even petals on the flower by using an inverted 5-point star  design, rotated and doubled within a circle of the same diameter of the brooch. Gah. But it  turned out perfect, so it was worth it.


 This is what the brown belt looks with the brooch pinned on it and holding it together.Just like it should.

As far as the second belt, I haven´t taken a "finished" picture yet, though it definitely looks great. :) I figured it was too much of a hassle (and expensive and time-consuming) to make a  belt from scratch. So I looked for a likely belt and found a nice silver one at (you guessed it) Bijoux Brigitte. Geez, such a good place for cosplay supplies (LoL) if it weren´t for the prices.

First step: Spray paint the silver belt gold (and decide that I want to buy a silver one for everyday use, hahaha). In a corner, you can see the reference image I printed out...which is like THE only official reference image of Zelda you can find for this game...Guess that´s what happens when you want to cosplay soemthing before its release....


Step 2: in order to get that "shield" look, it´s necessary to, well---fill in the holes. Preferrably with something slightly raised so as to keep it loking like a "shield", somehow. That´s where my foamy comes in again (thank goodness I have oddles left over from my armor last year).


I cut out the necessary amount of circles (12,  with 5sm diameter).

It was originally yellow foamy (though I also have white leftover). That way, the inevitable "shine through" through the paint (and in teh case that it gets chipped) is more easily disguised.

I painted it gold, just like the other pieces.


Oh, curious detail--I painted it (the foamy) with the same gold fabric paint that I plan on using on the dress, in the hopes that the shades will look similar enough. It works out nicely (though the surface of the foamy stays slightly "sticky"...not enough for anything to stick, per se, but enough to be recognizable as "sticky").

Step 3: Attach the circles to the belt. Let dry on a horizontal surface. I used superglue. Love that stuff.

domingo, 11 de septiembre de 2011

Chakram Progress, Sunday afternoon

After lunch, we decided that we might as well start cutting the chackram. It was going to be tricky: there are several sections in which the chackam blades have whorls and wierdness, which we wounldn´t be able to completely cut with the saw.

So we quickly got started. Needless to say, I´m kinda scared of saws.

My father was mainly here in this part of the process to help me cut. I was (and still am, somewhat) scared of saws--not just because if something went wrong, it could cut my finger off: no, what really worried me was the fact that I could essentially ruin what we´d been drawing the whole morning, as well as damage the wood.
My Dad started the cutting. But in the end, I joined too. It´s actually quite fun, once you get past the initial fear of killing your future chackram by accident.


Smiiiiile! I´ve got a saw and I don´t really know how to use it!! Well, maybe you should run.......


We ended up cutting both giant wheels, since setting up the tools again later would have been quite a hassle.


They look, amazingly, like tabletops. wierd, spiky tabletops that´ll poke you in the stomach as soon as you try to lean forward to eat your spoonful of soup.


When we looked at the watch, we realized it was only 18:20!! We still had over two hours or time left before our neighbors could actually start complaining about the noise in the garden. What to do, what to do.....???


 START SANDING, BABY!!!

Gosh, but how I do love sanding machines. Nice, pretty, efficient electrical ones. You get stuff done "over 9,000!!" times faster than with manual sanding....and the end result usually looks better too. Not that you don´t have to manually sand sometimes, but I definitely didn´t want to be sanding (p= 2πr times two) 628cm worth of wood by hand. Just thinking about it makes me dizzy. I finished one in about an hour and a bit ( had to sand both sides of the "table" to make the "blade"), so I decided to finish the other one up before 20:30 as well. In the end, I finished at 21 on the dot, but most of the neighbors were still at the pool, so I´m guessing that the noise wasn´t particularly bothersome. Or maybe it was--but they were feeling guilty about their loud parties/shrieking children/both and decided to let me make a racket for once. 


 Safety is important. The goggles were a given--my glasses don´t protect me from flying dust much better than...well....not wearing them. By the middle of the first wheel, I realized the vast quantity of sawdust I was inhaling. Luckily, I had a mask to wear. yay for being able to breathe!!

Sorry for the wobbly picture. my grandma took it. It´s the two "finished" wheels; now the only cuttting left to do is the center. We decided to leave that for after sanding due to the fact that the electric sander sends a lot of vibrations thorugh the wood--and the wood could split/snap/whatever if it´s subjected to too much (and weakened by having a hole through its center). 


Yeah, I look horrible. But I wear those clothes on purpose, because if they die, I won´t regret tossing them.  That´s why they´re "work-clothes"! An old too-short spaghetti strap and some gym shorts from when I was in middle school.

sábado, 10 de septiembre de 2011

Chackram progress, Friday and Sunday morning

The Friday before last, I  finally went out with my father to buy wood for making my chakram/wheels for lady Sun. It was hard to find (Leroy Merlin, why did you fail me?!?) but we ended up at a rather nice and professional store. To our great sadness, we found out that they didn´t cut circles (or rather "crowns/halos")--we had to end up ordering square cuts, to later cut into circles ourselves. it was a bit discouraging, but not too much.

We already had the design for the chakram, so we knew what the thickness (of the board) and measurements and such we wanted to cut the board into. In case you can´t see it too well, it´s a circle with a diameter of 1m. The inner corona should have a radius of 37cm: my Dad and I calculated (from looking at pictures) that the blades must be around 7cm and the inner "support" 6cm, making it a mere 13 cm of wood before you reach "empty circle space" as I like to call it.We estimate that the thickness should be of 12-15mm.

Our oh-so-professional-looking weapon design.
We ended up buying a 2.55m x 1.22m piece, and had it cut into two 1.02x1.02m pieces, with the rest of it saved as well. Unfortunately, the "lighter" version of the wood that we needed came at 10mm thickness at the most, so we ended up buying a thinner peice than we had planned as well. It´ll be easier to cut, i suppose, but I still would have liked it thicker. As soon as the pieces were cut, we took my babies home!!


The leftover pieces will work quite nicely for swordmaking, naginatamaking or just about any wooden weapon-making. Which makes me happy. I have enough for more than 2 swords, probably.

On Sunday, we got down to work. The first thing we did was draw the design onto the wooden squares.

 We used a chain (and a nail driven into the center of the board) to draw the arcs and circumferences in the design. Why a chain and not string? Chain has no give, while string and yarn does, leading to imperfect circles.

One of my (rather, LoL) original ways of  tracing everything so that all the designs ended up being symmetrical. I was too lazy to go get a clean sheet, so we used one which we´d scribbled calculations on.

We finished everything before lunch. I thought that that would be that--it was a lot of progress, frankly, for a couple of hours in the morning--but in the end, my Dad got really pumped and we decided to go for it and advance while we could later in the afternoon.


Current cosplay projects

I finally decided that I might as well start off a post by listing my current cosplay projects. I have two planned and with corresponding events:

Princess Zelda (Skyward Sword version):
I love this game, I have loved it from the first time I played. It has grown with me. I honestly thought that the first one I´d be cosplaying from this game series would be Link--as I am something of a Link fangirl and I openly fangirl cosplayer PikminLink.

Who wouldn´t fangirl her? She´s like a sex-changed Link stepped out into real life...

However, I have recently found out about the release date of the latest Zelda game, "Skyward Sword" in Europe. It´s in November!! "I definitely need to whip up a cosplay!!" was my initial thought, but....the nearest con is at the beginning of October. That´s weeks away, and no way am I going to manage chainmail in three weeks. So, next-best: Princess Zelda! Her design for Skyward Sword is relatively simple (and happily armor-free), and I´ve always wanted to cosplay her at some point in time.....so this cosplay-in progress idea was born!!

Lady Sun AKA "Sun Xiang Shang" (Dynasty Warriors 7 version)


i started this cosplay because one of my friends is a wicked fan of this series. She adores the fan-dude in it (he´s admittedly somewhat cool). She wanted to cosplay him, and I decedid that paired cosplay was better than one-one cosplay. I initially juggled the possibility of cosplaying Xiao Quiao (I loved the idea of making huge battle fans), but admittedly when you cosplay one of the Xiao sisters, you need to have the other one tagging along.


SUCH pretty fans, though. 

And since I would have my friend-as-a-bearded-man tagging along istead of friend-as-a-lovely-maiden...I decided to go with this one:
The lovely Lady Sun

What was it that made me pick her in the end? Was it her hair? Her outfit? Her supposedly independent personality in the game? No, none of these. What made me positively salivate to cosplay her was....

Her positively HUGE chackam/wheels/hula-hoops of DOOM, which will be a challenge to make.


Zelda will be cosplayed this early october, at the Japan Weekend convention. Sun Xiang Shang will make her appearance in the December ExpoComic.

My Glorfindel cosplay has temporarily been put on the back-burner, since the massive LotR group I was going to cosplay with decided to switch the dates of cosplaying to next year´s december Con. So I´m juggling the possibility of making a female!Thor cosplay for the December con as well (since it IS a Comic-con, more than a Manga-con).

viernes, 2 de septiembre de 2011

New blog!!

So....What will "Phases of the Moon" be about? I bet you´re all wondering (or not).

A lot of people who know me can tell you that I´m a cosplayer. I love cosplaying. I adore making clothes. Designing weapons and making them out of wood makes me happy.

So, this blog is going to be dedicated exclusively to my finsihsed and in-progress cosplays, to future cosplays, to tutorials (both mine and any  interesting ones I might find around the internet) and armor and weapon-making. In other words: extra-fun stuff!

I can´t say how often it´ll get updated, but I´m definitely going to post cosplay progress on it whenever I advance.